Nesting Guide
Permissions:
| Permissions | Description |
|---|---|
| SEND_MESSAGES | Allows a user to send text messages in a server. |
| READ_MESSAGES | Allows a user to read messages in a server. |
Let us go through the steps of setting up a nest.
First, we type in the /nest command and we get these options:
| Permissions | Description |
|---|---|
server_name | (Required) The name of the server you want to nest on. Pick from the provided options. |
gender | (Optional) The gender of the dinosaur. Pick from the provided options. |
eggs | (Optional) The number of eggs to nest, this will be dynamically changed based in the max set |
description | (Optional) The description of the nest for the nesting post (Max 1000 characters). |
multiplier_item | (Optional) The multiplier item to use for the nest |
nest_image | (Optional) The image of the nest for the nesting post (Max 1 image). |
schedule_time | (Optional) The time to schedule the OPENING of the nest. If you want to open the nest immediately, leave it EMPTY. It supports natural language and the maximum time is 7 days |
Nesting Command Example: For this example, the information filled out below was as follows:
/nest
| Arguments | Description |
|---|---|
server_name | Selected Server |
gender | Male |
description | Test Nest Description |
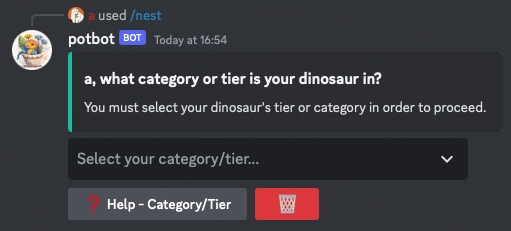
In this example, the nest will be created for the Potbot Server as a Male dinosaur with the description Test nest description. The nest will be created immediately and will be open for the expiration time set by the Discord server administrators. Once you have filled out the information, you can send the command and the nest creation process will begin. First, you have to select a Tier/Category of which dinosaur you want to nest as.
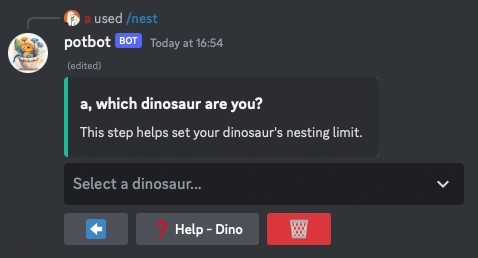
Once you have selected a tier, you will be given a list of dinosaurs to choose from. You can select a dinosaur by clicking on the dinosaur's name similar to choosing the tier.
TIP
For further help, you can always click on the available Help button on each of these steps!
Once you have selected a dinosaur, your nest will be created in the channel you sent the command in. The nest will be created as a post and will be used to join the nest as a hatchling. The nest will be created with the information you provided in the command.
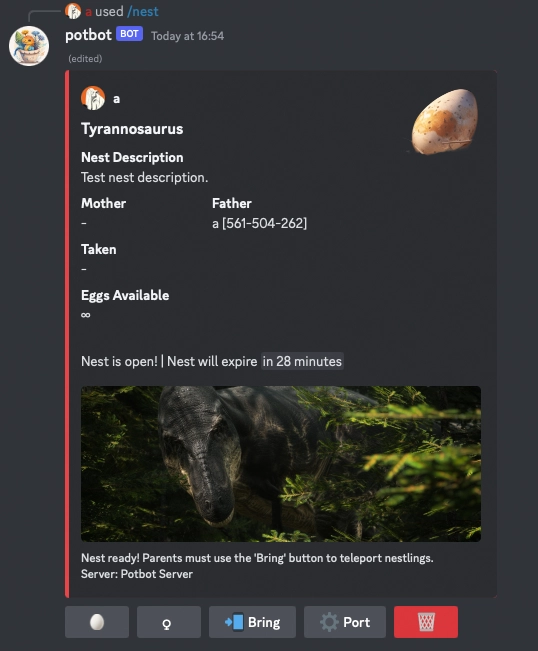
As you can see, the nest post contains all the information you provided in the command. Remember, you are not limited to the options in the example. You can add a nest image, schedule the nest to open at a later time, and more. The nest post will be used to join the nest as a hatchling.
Post Component
The post component is the post made by the bot after you have created a nest. This post will contain all the information about the nest and be used to join the nest as a hatchling. It will also include information about the dinosaur you are nesting as and other helpful descriptions.
Mother And Father / Parents
The mother and father of the dinosaur you are nesting with will be displayed in the post. The user that created the nest will be either the mother or the father, depending on the choice of gender.
If gender is not chosen, the post will simply have Parents instead of Mother or Father.
You cannot switch to a hatchling or the other gender. You must create a new nesting post to change to a hatchling or the other gender.
NOTE
Having BOTH genders is NOT required. You can have a nest with only a Mother or only a Father. Same applies for Parents.
Eggs / Taken
The number of eggs in the nest will be displayed in the post. The number of eggs will be the number of users that can join the nest as a hatchling.
The number of eggs will be by default ∞ (infinite). If you want to change it, you have to create [Dinosaur Profiles](#) with nest limits.
The eggs will update in real-time as users join the nest as a hatchling. The eggs will also update in real-time as users leave the nest as a hatchling. Any users joining the nest as hatchlings are also added to the list of users in the nest under the Taken field of the post embed.
Buttons
Now, let us go over all the buttons in the post component. Each button has a different functionality and is explained below:
| Icon | Description | Conditions for availability |
|---|---|---|
| 🥚 (Hatchling Button) | Used to join the nest as a Hatchling. | - If the post is unverified, any user can join the nest as a hatchling. - If the post is verified, only users that have verified their account can join the nest as a hatchling. - If the nest is full, no users can join the nest as a hatchling; the button will be disabled. - If you are the other parent of the nest, you can switch to being a hatchling by clicking this button. |
| ♂ (Male Button) | Used to join the nest as the Father of the nest. | - If the gender picked in the main post was Male, this button will not be available. - If the gender picked previously was Female, this button will be available. - If you are a hatchling and no father is in the nest, you can switch to being a father by clicking this button. |
| ♀ (Female Button) | Used to join the nest as the Mother of the nest. | - If the gender picked in the main post was Male, this button will be available. - If the gender picked in the main post was Female, this button will not be available. - If you are a hatchling and no mother is in the nest, you can switch to being a mother by clicking this button. |
| 🦖 (Parent Button) | Used to join the nest as a general Parent of the nest. There can only be Two parents in a nest. | |
| 👶 (Babify Button) | Used to verify that you are ready to be set to growth 0.0 and teleported to the nest. Only available to Hatchlings, the users on the Taken list. | |
| 📲 (Bring Button) | Used to bring a user to the nest. This is an alternative to the Babify Button where the parent can bring a user to the nest instead of the user joining the nest. Only available to Parents, the users on the Parents list. | |
| ⚙️ (Manage Button) | Used to manage the nest and its aspects. |
Bring Functionality
The bring functionality is an alternative to the Babify Button. The bring functionality allows the parent to bring a user to the nest instead of the user joining the nest. This is useful if the server wants to ensure that no random users join the nest and teleport to the nest.
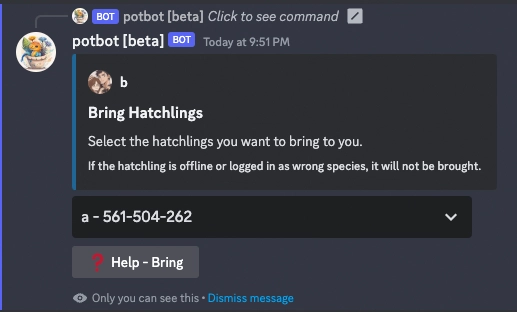
The bring functionality is only available to Parents, the users on the Parents list. In order to use the bring functionality, the parent must click the 📲 Bring button in the original nesting post. And simply select the users that they want to bring to the nest from the dropdown menu.
TIP
You can select multiple users to bring to the nest at once!
Using the In Game Nesting
Disable the bot teleport and growth system and use the game's nesting system instead.
| Icon | Description |
|---|---|
| 🥚( Hatchling Button) | Allows players to mark down that they will be joining the nest as a hatchling. |
| 🦖 (Parent Button) | Used to mark down that you are a Parent of the nest. There can only be Two parents in a nest. |
| ⚙️ (Manage Button) | Used to manage the nest and its aspects. |
| Commands | Description |
|---|---|
/nest | Nest a dinosaur into the game |
/list nests | Lists all active nests on the server |
/check nest | Check the nest of the given player |
/teleporttonest | Teleport to the nest of the given player |
/destroynest | Destroy the nest of a player |
/getnestresource | Get the resource of the nest for the given player |
/setnesthealth | Set the health of the nest |
/setnestresource | Set the resource of the nest for the given player |
/setnestslots | Set the slots of the nest for the given player |